I've been piddling with this potholder thing FOR-ever.
I'm so worried that it won't make sense to you.
But, I've worked it until it's kinda mush in meeee brain
I just need to put it out there...so...here goes!
You are probably wondering what "in-the-universe" is a...
I'm so worried that it won't make sense to you.
But, I've worked it until it's kinda mush in meeee brain
I just need to put it out there...so...here goes!
You are probably wondering what "in-the-universe" is a...
"semi-tute".
My definition is -
"a tutorial that comes with a disclaimer".
And, that disclaimer is... the creator of the above-mentioned
tutorial...doesn't really know what the heck-atations she is doing!
I mean...she knows how to do the actual project. It's the "tutorial" that
she isn't so great at doing!
Sincerely, I hope that you are able to understand the
wee bit of directions and lots of pictures. Please,
email me...if it isn't all clearer than mud? I will try
to help you out any way I can. =)
So, let's jump in - even if it's a little cold outside?
Materials I used - a "J" sized hook and one
ball of Sugar n Cream size? that has 150yds.
DIRECTIONS
Chain 38 stitches with a "J" hook to make a
9" square.
Your gage or number of stitches could vary according
to what size you want the potholder to be. I've
done quite a bit of experimenting with different size needles
and number of stitches for the size(s) I prefer.
----
Once you have the chain as long as you want
turn and go back to create the second row.
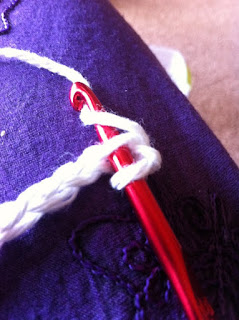
Above is the hole where you put the hook for
the first stitch on your second row.
pull one loop thru the chain...
and you would have two loops again...
(this is a different pic from the one above it, I promise)
then, pull thru both loops..
----
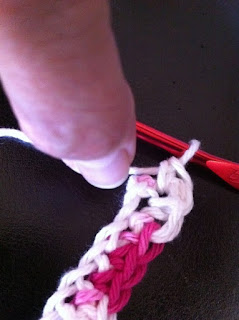
Second row finished looks like this =)
But, don't get too excited! You don't get to do a "real"
third row. You are actually going to crochet on the
bottom...and, then in circles (actually oval) ...
going around the original single chain you made
1 stitch in the end, then, turn to work the
underside of the original chain.
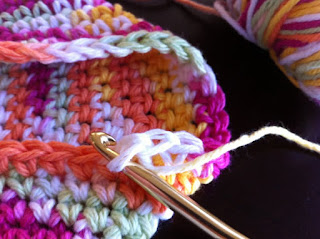
This is the placement of the next stitch. It is
in the original chain you made. Important,
you should be stitching on the underside.
It begins to look like this... you can see the
holes where your stitches should be going.
----
Reminder - no increase (multiple stitches) as
you round the corners of your oval.
Because there is no increase the oval doesn't lay flat.
You don't want it to lay flat...it is supposed to start creating
a pocket like the picture below
The pocket will get deeper...and as it does you will
need to start folding it down every so often like
this picture below
.....soon the sides, when folded down...
...will get closer...and
closer until....they KISS!
The sides should lay nicely alongside each other.
They should lay flat.
My preference for stitching it closed - is to weave
a long thread from side to side under both loops on each
side. I start by measuring a strand of the yarn
(still connected) 3 times the length of the diagonal corners.
I cut this long strand.
This potholder is actually finished. But, I wanted
to show that before weaving it closed, the yarn is
still attached to the crochet hook. Pull out from the ball
... of yarn, 3 times the length of the diagonal as shown above.
Now, pull the long strand thru your last loop to secure.
Again...this is BEFORE you weave the 'potholder sides'
closed. The reason that you pull this thread thru your last
loop is because you want it secured when you begin the
process to weave shut.
Weaving shut looks like this:
Finished looks like this:
At first, I crocheted the two sides closed.
When I did that, it created a ridge...that looked like this:
Please....if you have questions, just email me.
These are so fun for me to make! I hope that
you can enjoy making one too =)


12 comments:
I read through your tutorial and it's very clear to me. I've only made the single layer potholders so this new double layer will be fun to make! Not sure when I can get to it though! :-D Thank you for teaching us!
OK! This actually does make sense to me - and I'm relatively new at crocheting with a pattern. :D
It is all single crochet, right? I am going to try this for sure, these will be awesome gifties!
Thanks SO MUCH for this tute! :D
I have not crocheted for a long time so it is not too clear, however, if I tried it I am sure I could follow your directions.
I loved your hot-pad and I want to show you a double pad pattern I have. I make dozens of them for Christmas..hmmm I wonder where I stashed that pattern.. I better start looking..
b.j.
Thanks for this tutorial! I have been wanting to learn how to crochet pot holders. :)
God bless and keep you,
Sonia
Well, I am sure if I new a thing about crocheting then I would love this tutorial.
These are my favotite kind of hotpads to crochet! I have at least 6 or 7 in the drawer next to the stove. Thanks for the tute!
Thanks for sharing I'm going to try making one.((Hugs))
Thanks for sharing I'm going to try making one.((Hugs))
What a GREAT tutorial! I wanted to email you to thank you for my winning fabrics for your giveaway last week. (could not find your email address) So please let me thank you right now! I received the fat quarters and they are perfect! Thank you! Thank you!!
Hugs,
Linda
I made one of these yesterday while selling tickets on my guild's opportunity quilt! I just came back to double-check the weaving together part. I was able to do it with no problems (except that being interrupted, I lost count on my chain & mine's a bit smaller. :D Thanks again for the tute!!
My friend Marilyn said that her grandmother taught her how to make these. Marilyn likes to use them as trivets, so instead of closing them, she leaves them open & puts Thermalam batting inside. That way she can remove the batting & throw the pad in the washer & dryer.
Cool crochet tutorial!
Good pictures. I used to crochet when I was young. I NEED a refresher.
Thanks :D
Post a Comment